How to Implement Navigation from a Table View in Swift
In the previous tutorial, How to Customize a Table View Cell, we learned how to create custom table view cells.
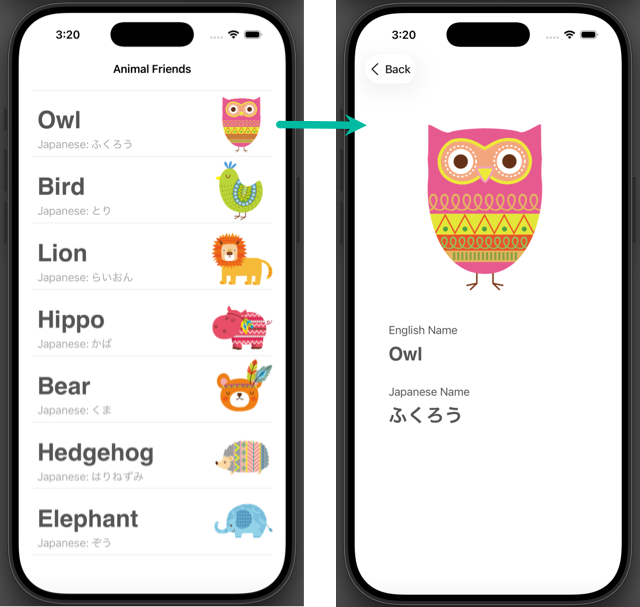
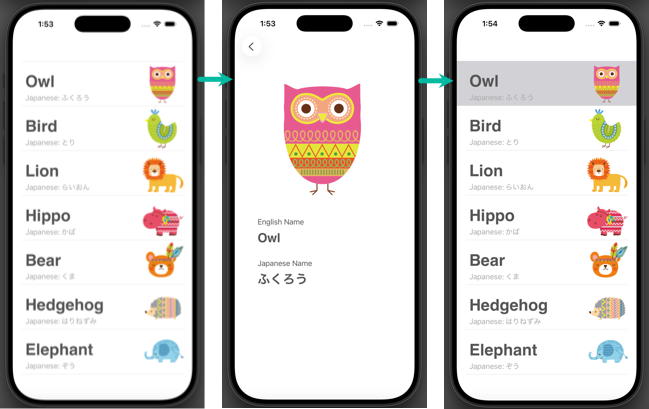
This time, we'll take it further by implementing screen navigation: when a cell is tapped, we'll transition from the Table View screen to a detail screen, displaying the selected animal's data, as shown below.
We'll continue from the previous project and assume you already know how to generate outlets. If not, please review How to Use Table View and How to Customize a Table View Cell.
- Embed in a Navigation Controller
- Create the Detail Screen (DetailViewController)
- Create the DetailViewController Class
- Add DetailViewController and Set Its Class
- Place UI Objects in DetailViewController
- Create Outlets for DetailViewController
- Connect Screens with a Segue
- Pass Data to the Detail Screen with prepare
- Set the Navigation Bar Title and Back Button
- Build and Run in the Simulator
Embed in a Navigation Controller
What is a Navigation Controller?
A Navigation Controller manages a stack of view controllers, known as the navigation stack, and handles screen transitions between them.
When a view controller is embedded in a Navigation Controller, a navigation bar is automatically added at the top, along with a back button when applicable.
Although we won't do it here, you can also add bar button items (Add, Delete, Edit, Cancel, Save, etc.) to the navigation bar.
Embedding a View Controller in a Navigation Controller
Let's embed the Table View's view controller into a Navigation Controller.
Select the view controller, click the Embed In button at the bottom-right of the editor area, and choose Navigation Controller.
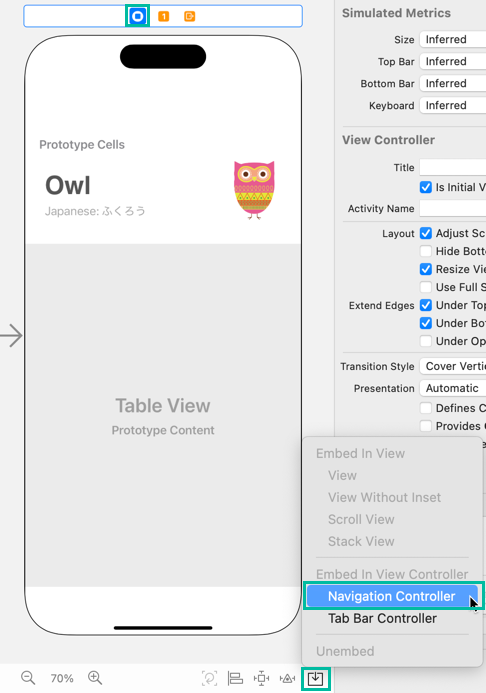
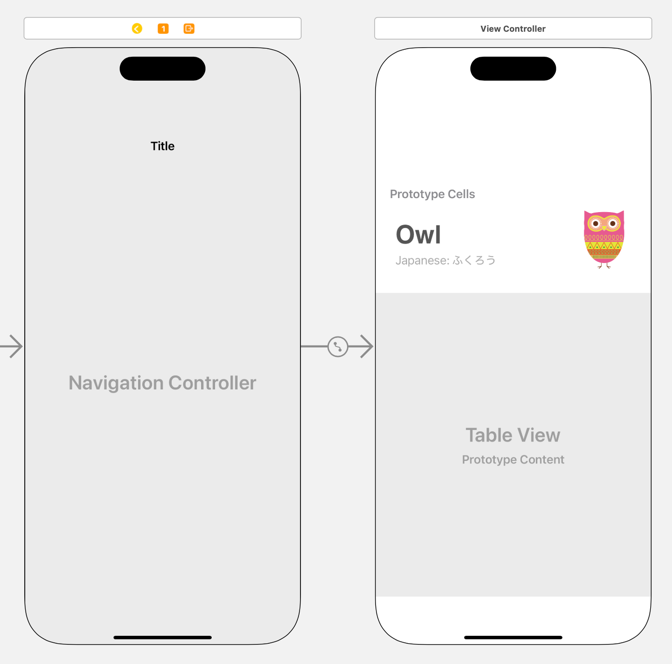
The view controller is now embedded in a Navigation Controller, as shown below.
Create the Detail Screen (DetailViewController)
Create the DetailViewController Class
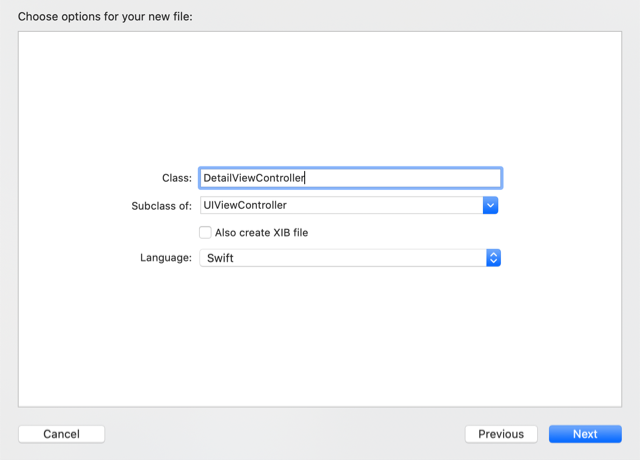
First, create a class for the detail screen's view controller.
Go to File > New > File from Template..., select iOS Cocoa Touch Class, and click Next. Name the class DetailViewController, set Subclass of to UIViewController, and generate the file.
Add DetailViewController and Set Its Class
Now, add a new view controller that will serve as the detail screen, displayed when transitioning from the Table View.
Open the Object Library, find View Controller, and drag it next to the Table View's view controller.
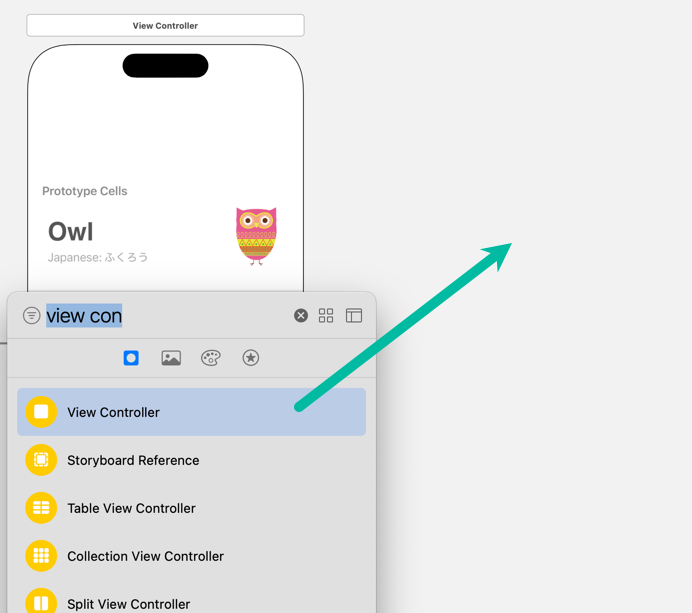
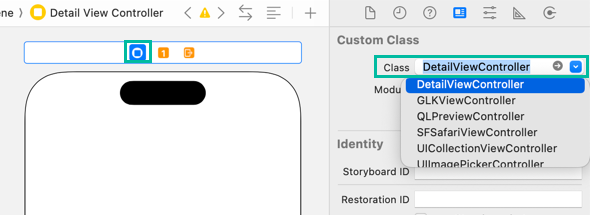
Select the new view controller, open the Identity Inspector, and under Custom Class, set the Class dropdown to DetailViewController.
Place UI Objects in DetailViewController
Let's place an Image View and Labels on the newly created View Controller.
I'll list example values for position, size, and constraints, but they don't have to match exactly—approximate values are fine.
First, drag an Image View from the Object Library to roughly where you want it, then add constraints.
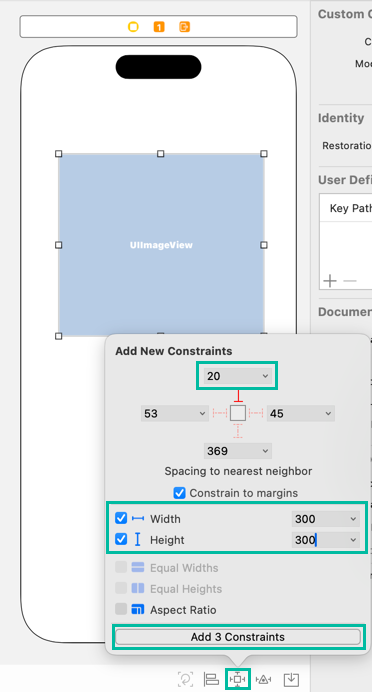
- Spacing to nearest neighbor - Top: 20
- Width: 300
- Height: 300
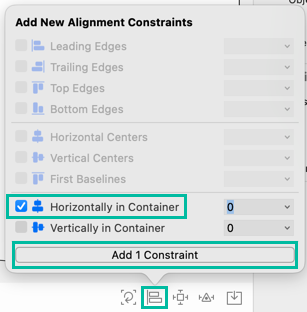
- Alignment: Horizontally in Container
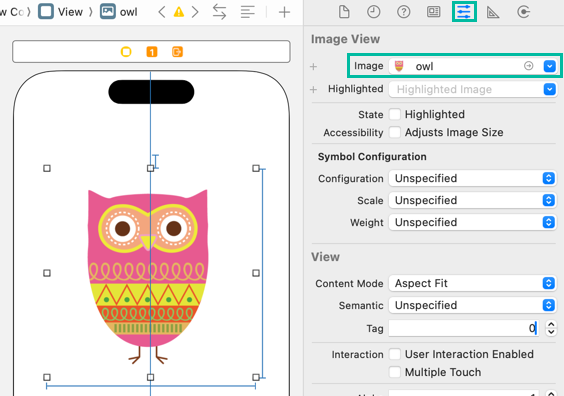
If you select an actual image in the Attributes inspector's Image field, it's easier to visualize the result.
Using the same approach, add four Labels as follows.
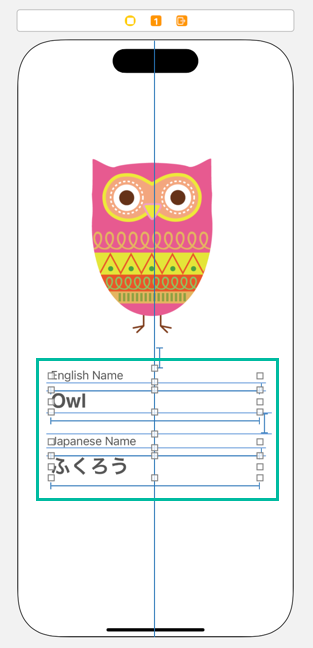
- Text: English Name
- Color: Dark Gray Color
- Spacing to nearest neighbor - Top: 30
- Width: 300
- Alignment: Horizontally in Container
- Text: Owl
- Color: Dark Gray Color
- Font: Helvetica Bold 28.0
- Spacing to nearest neighbor - Top: 10
- Width: 300
- Alignment: Horizontally in Container
- Text: Japanese Name
- Color: Dark Gray Color
- Spacing to nearest neighbor - Top: 30
- Width: 300
- Alignment: Horizontally in Container
- Text: ふくろう
- Color: Dark Gray Color
- Font: Helvetica Bold 28.0
- Spacing to nearest neighbor - Top: 10
- Width: 300
- Alignment: Horizontally in Container
Generate Outlets for DetailViewController
Next, generate outlets for DetailViewController.
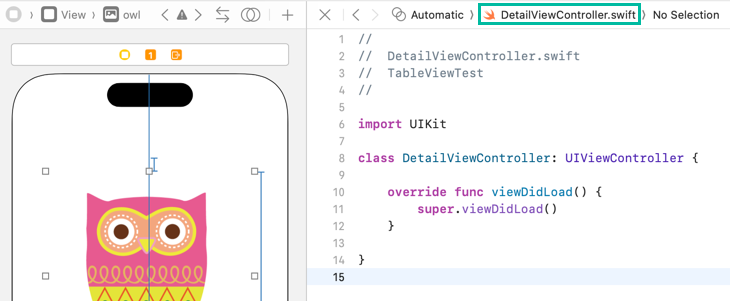
In the storyboard, with something inside DetailViewController selected (for example, the owl Image View), open the Assistant Editor via Editor > Assistant or from Adjust Editor Options > Assistant.
When the Assistant Editor opens, make sure the displayed file is DetailViewController.swift.
If not, click Automatic at the top of the Assistant Editor and switch to DetailViewController.swift.
Then, from the Image View and the two labels, “Owl” and “ふくろう”, hold the ⌃ Control key and drag to the DetailViewController class to create the following three outlets.
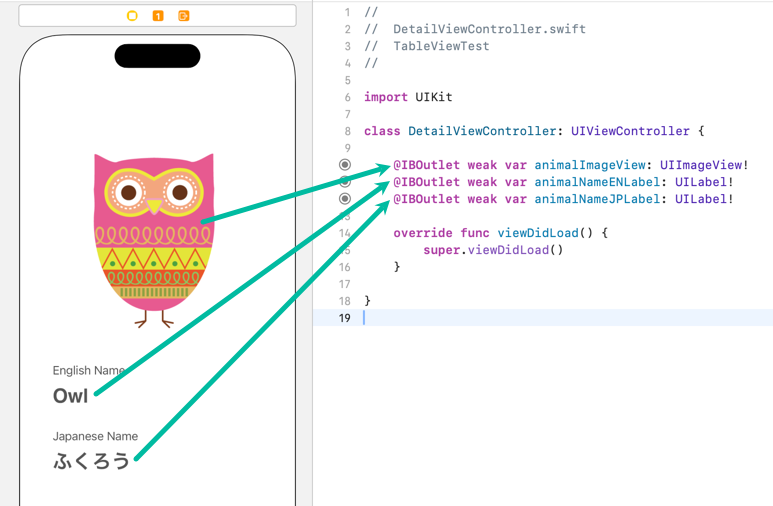
@IBOutlet weak var animalImageView: UIImageView!
@IBOutlet weak var animalNameENLabel: UILabel!
@IBOutlet weak var animalNameJPLabel: UILabel!
Connect Screens with a Segue
A segue defines the transition between two view controllers in the storyboard.
Here, we'll create a segue so that tapping a table view cell transitions to the detail screen.
First, in the storyboard, select AnimalTableViewCell inside the Table View.
Hold the ⌃ Control key, drag to the Detail View Controller, release, and choose Show from the segue type popup.
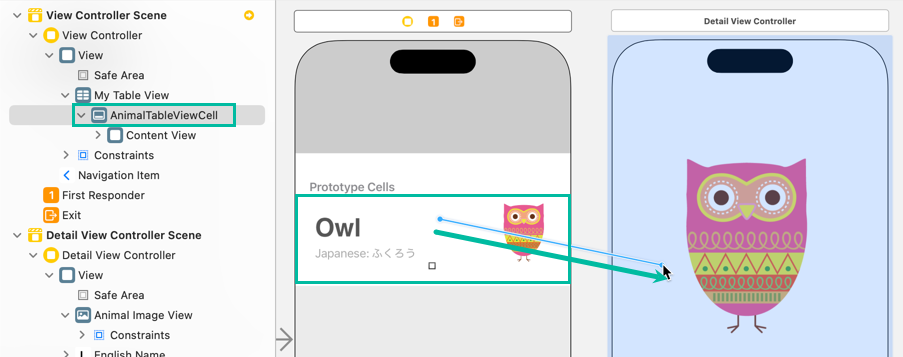
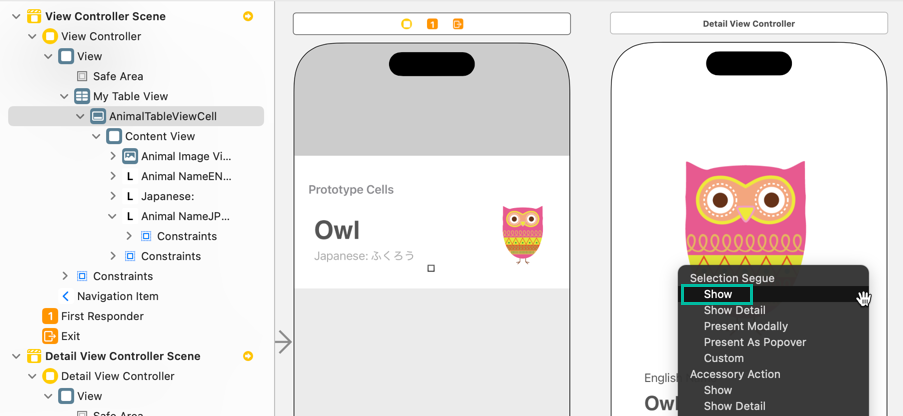
The segue now appears in the storyboard, and a Navigation Item is added to the top of the Detail View Controller.
When this Show segue runs, tapping AnimalTableViewCell pushes the DetailViewController onto the Navigation Controller's stack and presents it modally above the original view controller.
We'll need to identify this segue from code later, so select the segue and set the Identifier under Storyboard Segue in the Attributes inspector to showDetailSegue.

Pass Data to the Detail Screen in prepare
When a cell is tapped, we'll pass that animal's data to the detail screen.
Open DetailViewController.swift and define a variable animal of type Animal.
When transitioning from the Table View's view controller, we'll assign a value to animal, and in viewDidLoad() we'll set the Image View and Labels using that animal.
import UIKit

class DetailViewController: UIViewController {

    var animal: Animal!

    @IBOutlet weak var animalImageView: UIImageView!
    @IBOutlet weak var animalNameENLabel: UILabel!
    @IBOutlet weak var animalNameJPLabel: UILabel!

    override func viewDidLoad() {
        super.viewDidLoad()

        animalImageView.image = UIImage(named: animal.imageName)
        animalNameENLabel.text = animal.nameEN
        animalNameJPLabel.text = animal.nameJP
    }

}
Next, open ViewController.swift and add a method named prepare().
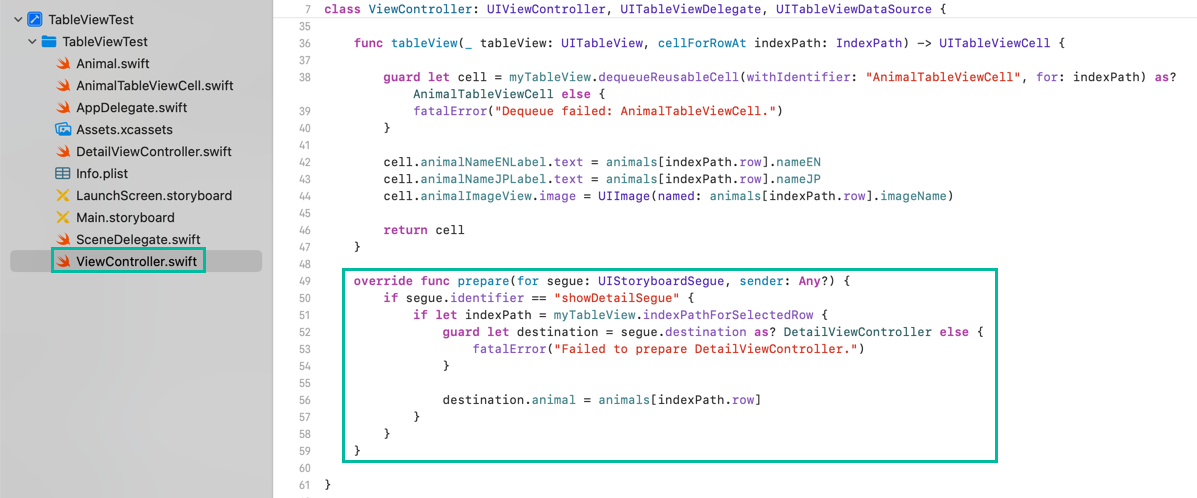
override func prepare(for segue: UIStoryboardSegue, sender: Any?) {
    if segue.identifier == "showDetailSegue" {
        if let indexPath = myTableView.indexPathForSelectedRow {
            guard let destination = segue.destination as? DetailViewController else {
                fatalError("Failed to prepare DetailViewController.")
            }

            destination.animal = animals[indexPath.row]
        }
    }
}
prepare() is called just before a segue is performed, allowing you to do work before the next view controller appears.
Here, when the segue identifier is showDetailSegue, we obtain the destination DetailViewController and set its animal to the selected Animal at indexPath.
With navigation and data passing complete, there's one more refinement: after you go to the detail screen and return, the tapped cell remains selected (highlighted).
To fix this, add the following code to the ViewController class:
override func viewWillAppear(_ animated: Bool) {
    if let indexPath = myTableView.indexPathForSelectedRow{
        myTableView.deselectRow(at: indexPath, animated: true)
    }
}
When this view controller reappears, viewWillAppear() is called, and the selected cell is deselected.
For reference, here is the full ViewController.swift code:
import UIKit

class ViewController: UIViewController, UITableViewDelegate, UITableViewDataSource {

    var animals: [Animal] = []

    @IBOutlet weak var myTableView: UITableView!

    override func viewDidLoad() {
        super.viewDidLoad()

        myTableView.dataSource = self
        myTableView.delegate = self

        loadData()
    }

    func loadData() {
        animals.append(Animal(nameEN: "Owl", nameJP: "ふくろう", imageName: "owl"))
        animals.append(Animal(nameEN: "Bird", nameJP: "とり", imageName: "bird"))
        animals.append(Animal(nameEN: "Lion", nameJP: "らいおん", imageName: "lion"))
        animals.append(Animal(nameEN: "Hippo", nameJP: "かば", imageName: "hippo"))
        animals.append(Animal(nameEN: "Bear", nameJP: "くま", imageName: "bear"))
        animals.append(Animal(nameEN: "Hedgehog", nameJP: "はりねずみ",imageName: "hedgehog"))
        animals.append(Animal(nameEN: "Elephant", nameJP: "ぞう", imageName: "elephant"))
    }

    func tableView(_ tableView: UITableView, numberOfRowsInSection section: Int) -> Int {
        return animals.count
    }

    func tableView(_ tableView: UITableView, cellForRowAt indexPath: IndexPath) -> UITableViewCell {

        guard let cell = myTableView.dequeueReusableCell(withIdentifier: "AnimalTableViewCell", for: indexPath) as? AnimalTableViewCell else {
            fatalError("Dequeue failed: AnimalTableViewCell.")
        }

        cell.animalNameENLabel.text = animals[indexPath.row].nameEN
        cell.animalNameJPLabel.text = animals[indexPath.row].nameJP
        cell.animalImageView.image = UIImage(named: animals[indexPath.row].imageName)

        return cell
    }

    override func prepare(for segue: UIStoryboardSegue, sender: Any?) {
        if segue.identifier == "showDetailSegue" {
            if let indexPath = myTableView.indexPathForSelectedRow {
                guard let destination = segue.destination as? DetailViewController else {
                    fatalError("Failed to prepare DetailViewController.")
                }

                destination.animal = animals[indexPath.row]
            }
        }
    }

    override func viewWillAppear(_ animated: Bool) {
        if let indexPath = myTableView.indexPathForSelectedRow{
            myTableView.deselectRow(at: indexPath, animated: true)
        }
    }
}
Set the Navigation Bar Title and Back Button
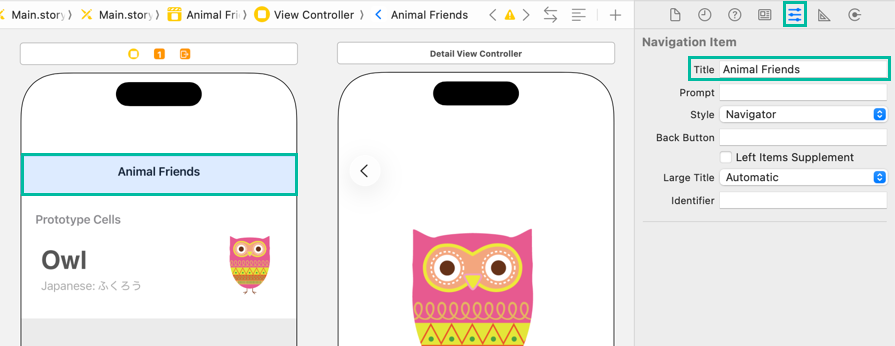
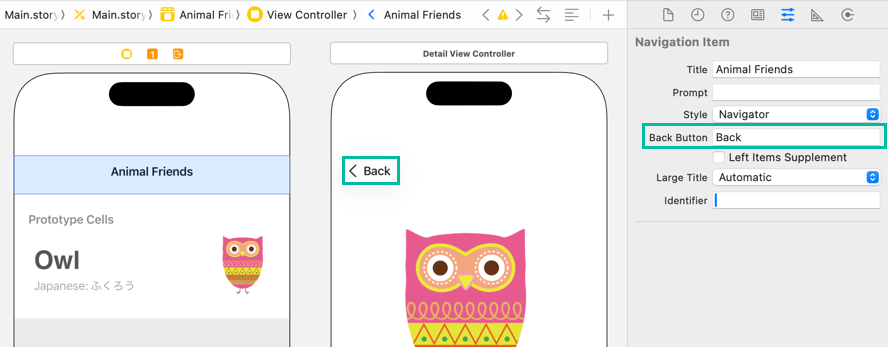
Let's set the app title “Animal Friends” on the navigation bar and change the back button on the detail screen to “Back”.
Open the storyboard and click the navigation bar of the Table View's View Controller.
On the right, open the Attributes inspector and set the Navigation Item's Title to “Animal Friends”.
And set Back Button (under Title) to “Back”.
Build and Run in the Simulator
Now build and run.
Click the button on the left side of the toolbar. The selected simulator will launch, the app will be installed, and it will run.


The animal you tapped in the list appears on the detail screen.
That's it for implementing navigation from a Table View to a detail screen.