How to Display Maps in an iOS App (Swift)
Here, I will explain how to display a map in an iOS app using Swift.
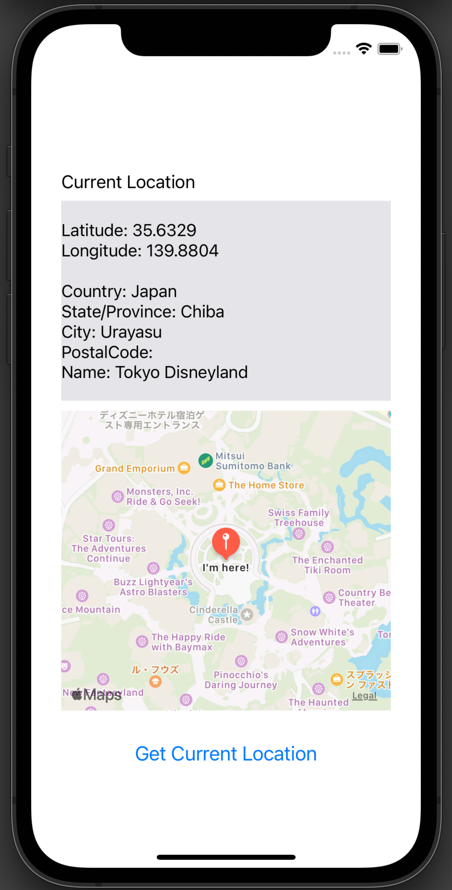
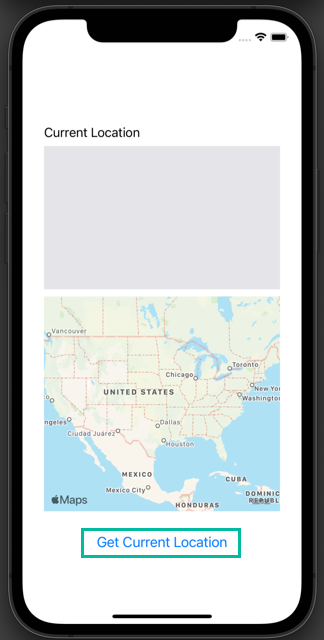
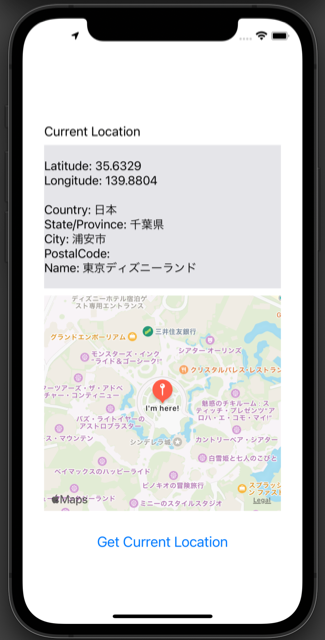
In the previous article, How to Get the Current Location in an iOS App, we created an app to fetch the current location. This time, we will extend it by adding a map that shows the current location, like this:
We will proceed under the assumption that you already have the app to fetch the current location, but even if you don't, you can still display a map as long as you have latitude and longitude coordinates.
Add a Map Kit View to the Current Location App
In the app created in How to Get the Current Location in an iOS App, we will now add a Map View.
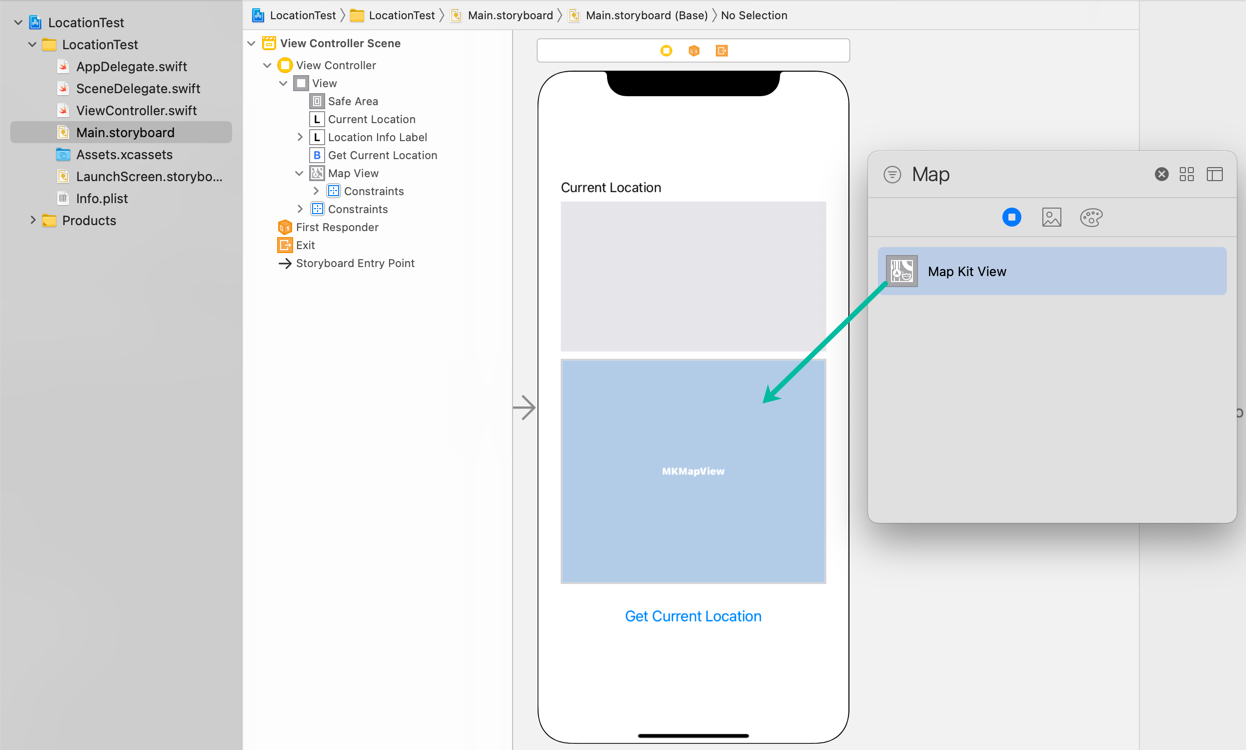
Open your project in Xcode and display the Main.storyboard.
Search for Map Kit View in the Object Library and add it between the label that shows the location information and the Get Current Location button in the View Controller.
Create an outlet from the added Map Kit View and name it mapView.
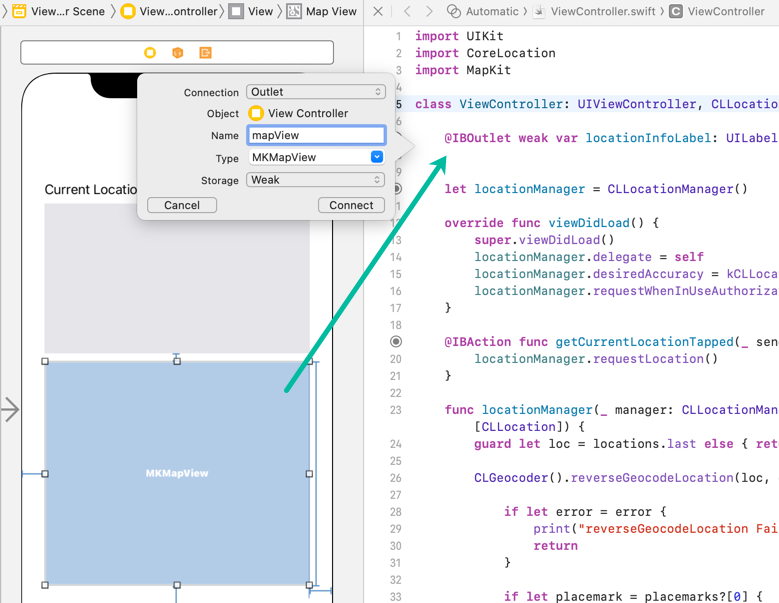
@IBOutlet weak var mapView: MKMapView!How to Display a Map in an iOS App
Now, let's write the Swift code to display a map.
We will add code to the project we created in “How to Get the Current Location in an iOS App.” However, you don't necessarily need to fetch the current location. As long as you have latitude and longitude coordinates, you can display a map — I'll explain this later.
To display a map, we need to use the MapKit framework, so import MapKit:
import MapKitTo display a map around the current location and drop a pin on it, add the following code inside the locationManager(_:didUpdateLocations:) method in your ViewController class:
let cr = MKCoordinateRegion(center: loc.coordinate, latitudinalMeters: 500, longitudinalMeters: 500)
mapView.setRegion(cr, animated: true)

let pa = MKPointAnnotation()
pa.title = "I'm here!"
pa.coordinate = loc.coordinate
mapView.removeAnnotations(mapView.annotations)
mapView.addAnnotation(pa)
Line 1 creates an MKCoordinateRegion that defines the region displayed in the mapView.
The center argument specifies the central point as a CLLocationCoordinate2D. Here, loc contains the location information we obtained.
Even if you don't use the current location, you can generate a CLLocation with specific latitude and longitude, for example:
let loc = CLLocation(latitude: 35.6762, longitude: 139.6503), and then pass loc.coordinate.
The latitudinalMeters and longitudinalMeters specify the visible area in meters (north-south and east-west).
Line 2 sets the display region on the mapView.
Lines 4 - 6 create an MKPointAnnotation for the pin. The title sets the text displayed with the pin, and coordinate sets its position.
Line 7 removes any existing pins from the mapView.
Line 8 adds the new pin to the mapView.
Now the code to display a map is complete. The full ViewController.swift looks like this:
import UIKit
import CoreLocation
import MapKit

class ViewController: UIViewController, CLLocationManagerDelegate {

    @IBOutlet weak var locationInfoLabel: UILabel!
    @IBOutlet weak var mapView: MKMapView!

    let locationManager = CLLocationManager()

    override func viewDidLoad() {
        super.viewDidLoad()
        locationManager.delegate = self
        locationManager.desiredAccuracy = kCLLocationAccuracyBest
        locationManager.requestWhenInUseAuthorization()
    }

    @IBAction func getCurrentLocationTapped(_ sender: Any) {
        locationManager.requestLocation()
    }

    func locationManager(_ manager: CLLocationManager, didUpdateLocations locations: [CLLocation]) {
        guard let loc = locations.last else { return }

        CLGeocoder().reverseGeocodeLocation(loc, completionHandler: {(placemarks, error) in

            if let error = error {
                print("reverseGeocodeLocation Failed: \(error.localizedDescription)")
                return
            }

            if let placemark = placemarks?[0] {

                var locInfo = ""
                locInfo = locInfo + "Latitude: \(loc.coordinate.latitude)\n"
                locInfo = locInfo + "Longitude: \(loc.coordinate.longitude)\n\n"

                locInfo = locInfo + "Country: \(placemark.country ?? "")\n"
                locInfo = locInfo + "State/Province: \(placemark.administrativeArea ?? "")\n"
                locInfo = locInfo + "City: \(placemark.locality ?? "")\n"
                locInfo = locInfo + "PostalCode: \(placemark.postalCode ?? "")\n"
                locInfo = locInfo + "Name: \(placemark.name ?? "")"

                self.locationInfoLabel.text = locInfo
            }
        })

        let cr = MKCoordinateRegion(center: loc.coordinate, latitudinalMeters: 500, longitudinalMeters: 500)
        mapView.setRegion(cr, animated: true)

        let pa = MKPointAnnotation()
        pa.title = "I'm here!"
        pa.coordinate = loc.coordinate
        mapView.removeAnnotations(mapView.annotations)
        mapView.addAnnotation(pa)
    }

    func locationManager(_ manager: CLLocationManager, didFailWithError error: Error) {
        print("error: \(error.localizedDescription)")
    }
}
If you only want to display a map with specific latitude and longitude (without fetching the current location), you can use the following code:
No permission settings are required in this case.
import UIKit
import MapKit

class ViewController: UIViewController {

    @IBOutlet weak var mapView: MKMapView!

    override func viewDidLoad() {
        super.viewDidLoad()

        let loc = CLLocation(latitude: 35.6762, longitude: 139.6503)
        let cr = MKCoordinateRegion(center: loc.coordinate, latitudinalMeters: 500, longitudinalMeters: 500)
        mapView.setRegion(cr, animated: true)

        let pa = MKPointAnnotation()
        pa.title = "I'm here!"
        pa.coordinate = loc.coordinate
        mapView.removeAnnotations(mapView.annotations)
        mapView.addAnnotation(pa)
    }
}
Testing the Map Display App in the Simulator
Now let's test the app in the simulator.
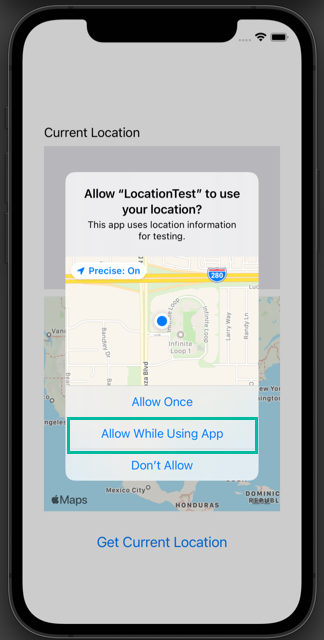
When the app launches, if you haven't granted location permissions yet, you'll see a prompt asking for access to location information. Tap “Allow While Using App.”
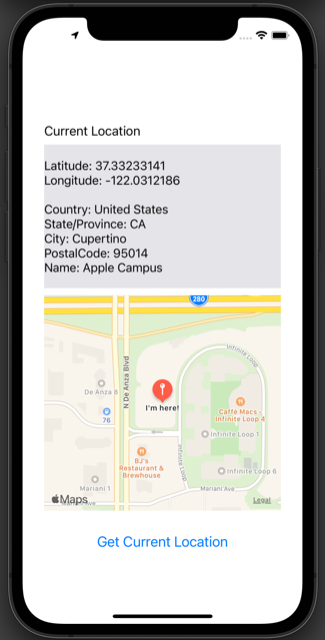
On the initial screen, tap “Get Current Location.” The label will display your current location info, and the Map Kit View will show the map centered on your location.
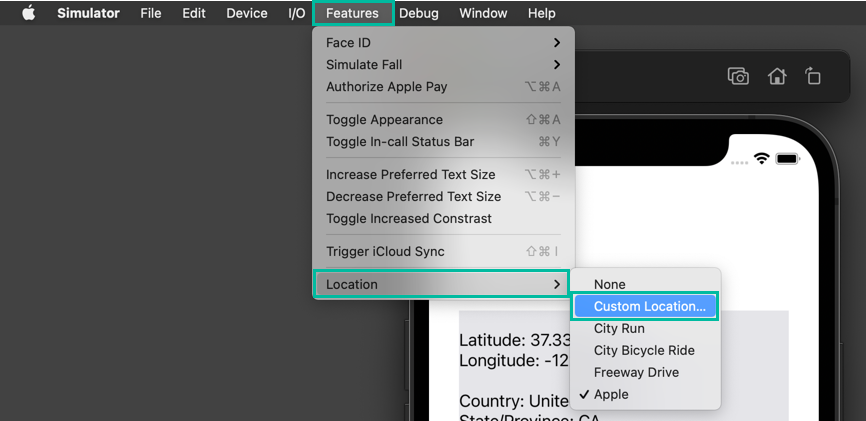
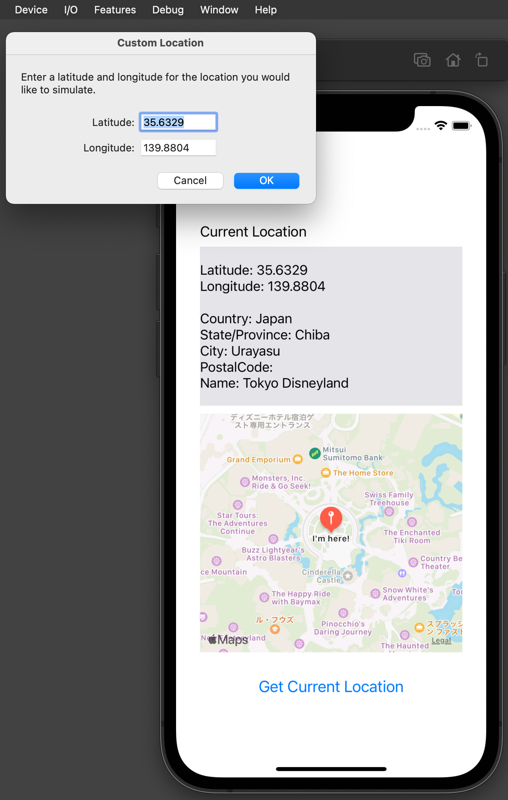
In the simulator, the location is set to Apple by default, but you can change it to a custom location with latitude and longitude values for testing.
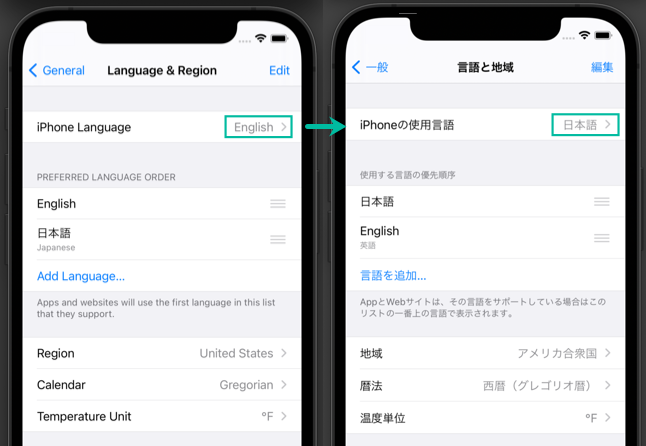
Additionally, if you change the iPhone's language setting in the simulator from English (US) to Japanese, the displayed information will appear in Japanese.
That's it! We've covered how to display a map in an iOS app using Swift.