How to Get the Current Location in an iOS App (Swift)
Here, we will explain how to get the current location in an iOS app using Swift.
In this tutorial, we'll create a simple iOS app where tapping a button labeled “Get Current Location” will display the current location information in a label.
Preparing an iOS App to Get the Current Location
First, let's create a simple iOS app for testing. When a button is tapped, the app will fetch and display the current location.
Create a new project in Xcode by selecting [iOS] > [App].
On the Main storyboard's View Controller, add two labels and one button from top to bottom. The design and layout can be simple.
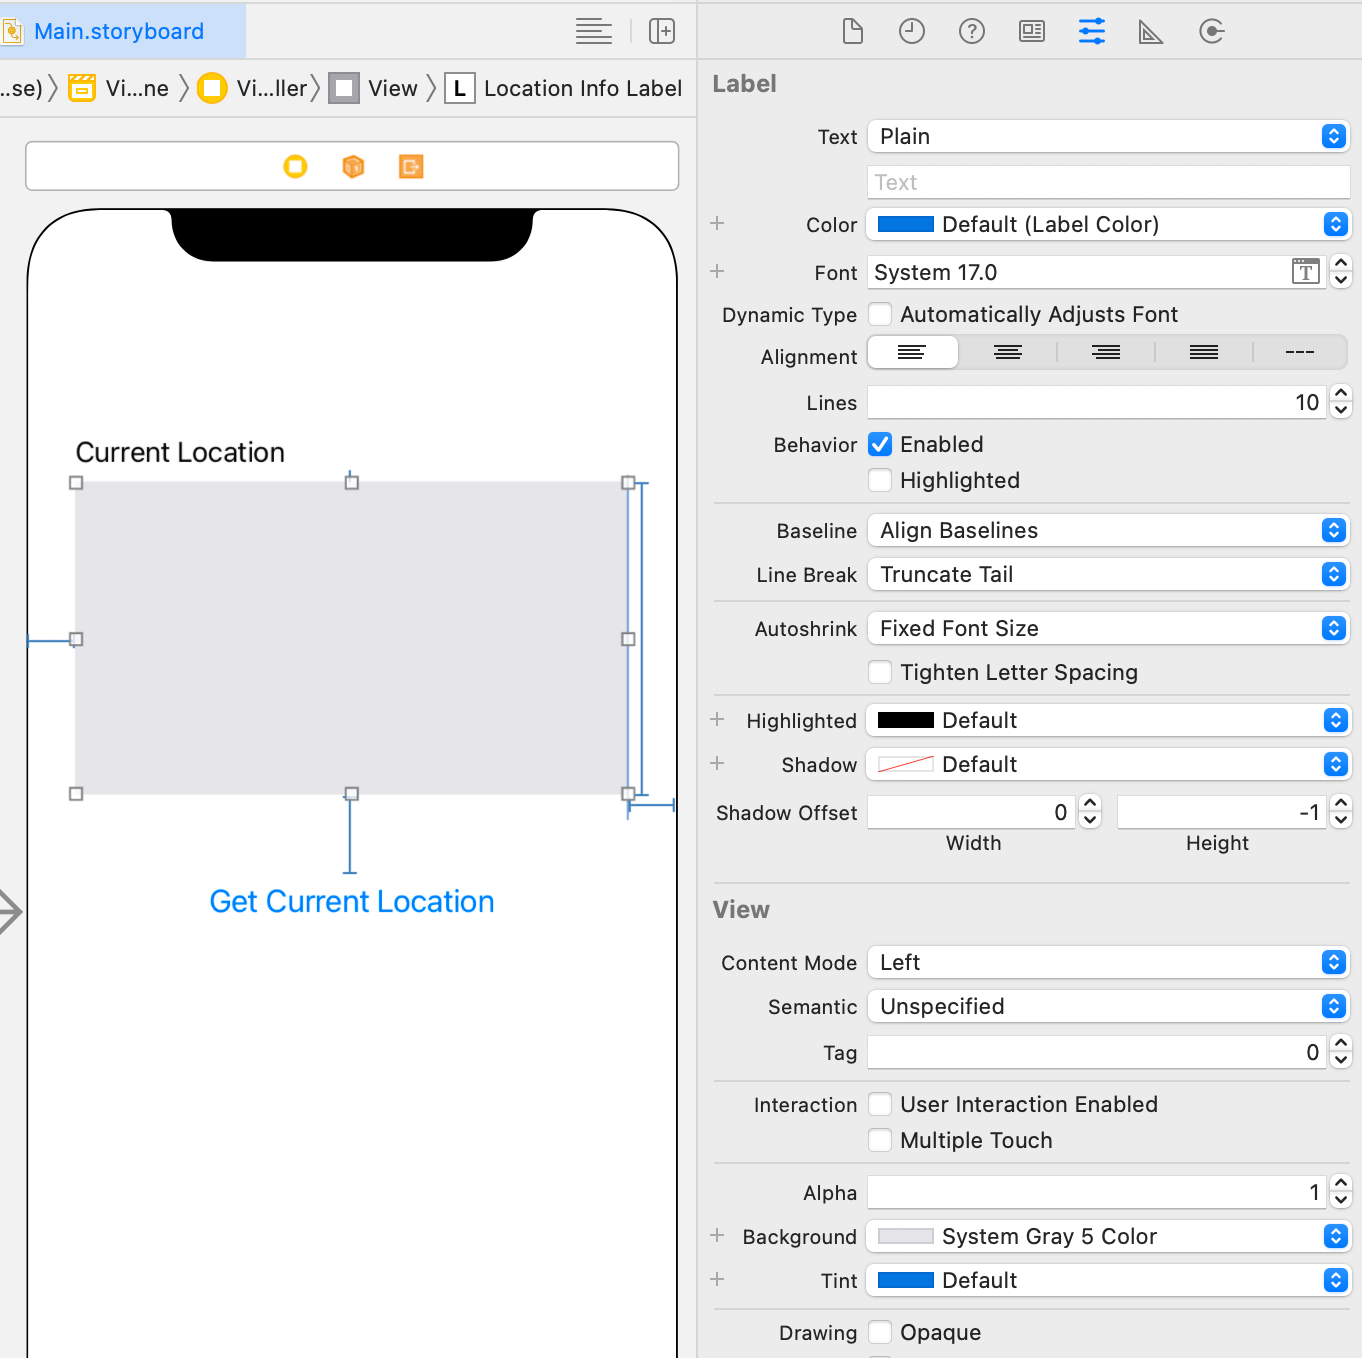
Change the text of the first label to “Current Location.”
The second label will display the location information, so increase its size, set Lines to 10, and add a light gray background.
Change the button text to “Get Current Location.”
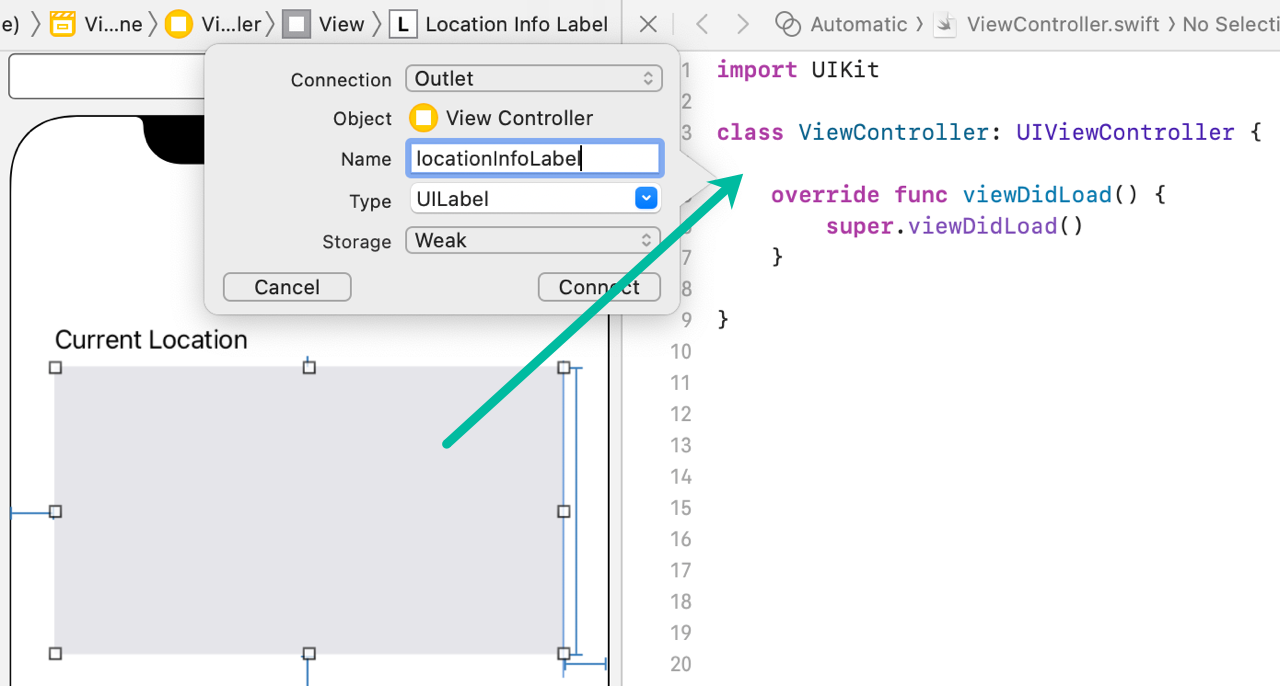
Create an outlet for the second label named locationInfoLabel.
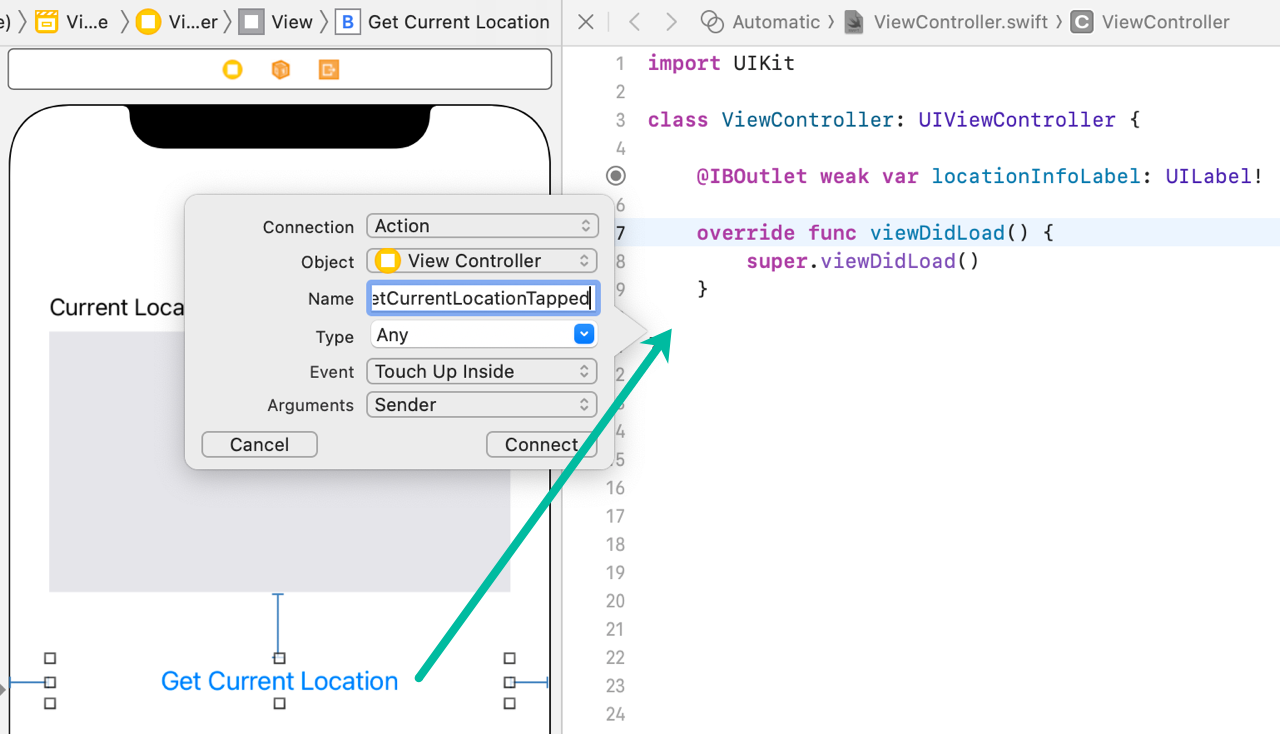
Create an action for the button named getCurrentLocationTapped with the TouchUpInside event.
import UIKit

class ViewController: UIViewController {

    @IBOutlet weak var locationInfoLabel: UILabel!

    override func viewDidLoad() {
        super.viewDidLoad()
    }

    @IBAction func getCurrentLocationTapped(_ sender: Any) {
    }
}
That completes the basic setup for the iOS app to fetch the current location.
How to Get Current Location Information in an iOS App
Now let's write the Swift code to fetch the current location.
To get location information, we use the CoreLocation framework. Specifically, the CLLocationManager class retrieves the current location.
Also, the ViewController must conform to CLLocationManagerDelegate to handle events from CLLocationManager.
import UIKit
import CoreLocation

class ViewController: UIViewController, CLLocationManagerDelegate {

    @IBOutlet weak var locationInfoLabel: UILabel!

    let locationManager = CLLocationManager()

    override func viewDidLoad() {
        super.viewDidLoad()
        locationManager.delegate = self
    }

    @IBAction func getCurrentLocationTapped(_ sender: Any) {
    }
}
CLLocationManager provides various events. In this app, we'll use the following two:
- locationManager(_:didUpdateLocations:) – Called when new location data is available.
- locationManager(_:didFailWithError:) – Called when location data could not be retrieved.
func locationManager(_ manager: CLLocationManager, didUpdateLocations locations: [CLLocation]) {
}

func locationManager(_ manager: CLLocationManager, didFailWithError error: Error) {
}
Update the viewDidLoad() method as follows:
override func viewDidLoad() {
    super.viewDidLoad()
    locationManager.delegate = self
    locationManager.desiredAccuracy = kCLLocationAccuracyBest
    locationManager.requestWhenInUseAuthorization()
}
The desiredAccuracy property specifies the accuracy level. Here we use kCLLocationAccuracyBest, but using a lower accuracy can return results faster. Choose what's appropriate for your app.
Since we only need location data while the app is in use, we call requestWhenInUseAuthorization() to request permission to use location services during app usage.
If you need continuous access to location services, use requestAlwaysAuthorization() instead.
When the button is tapped, getCurrentLocationTapped() will request the location. The delegate method locationManager(_:didUpdateLocations:) retrieves the location, reverse-geocodes it, and displays the result in the label.
Here's the code:
import UIKit
import CoreLocation

class ViewController: UIViewController, CLLocationManagerDelegate {

    @IBOutlet weak var locationInfoLabel: UILabel!

    let locationManager = CLLocationManager()

    override func viewDidLoad() {
        super.viewDidLoad()
        locationManager.delegate = self
        locationManager.desiredAccuracy = kCLLocationAccuracyBest
        locationManager.requestWhenInUseAuthorization()
    }

    @IBAction func getCurrentLocationTapped(_ sender: Any) {
        locationManager.requestLocation()
    }

    func locationManager(_ manager: CLLocationManager, didUpdateLocations locations: [CLLocation]) {
        guard let loc = locations.last else { return }

        CLGeocoder().reverseGeocodeLocation(loc, completionHandler: {(placemarks, error) in

            if let error = error {
                print("reverseGeocodeLocation Failed: \(error.localizedDescription)")
                return
            }

            if let placemark = placemarks?[0] {

                var locInfo = ""
                locInfo = locInfo + "Latitude: \(loc.coordinate.latitude)\n"
                locInfo = locInfo + "Longitude: \(loc.coordinate.longitude)\n\n"

                locInfo = locInfo + "Country: \(placemark.country ?? "")\n"
                locInfo = locInfo + "State/Province: \(placemark.administrativeArea ?? "")\n"
                locInfo = locInfo + "City: \(placemark.locality ?? "")\n"
                locInfo = locInfo + "PostalCode: \(placemark.postalCode ?? "")\n"
                locInfo = locInfo + "Name: \(placemark.name ?? "")"

                self.locationInfoLabel.text = locInfo
            }
        })
    }

    func locationManager(_ manager: CLLocationManager, didFailWithError error: Error) {
        print("error: \(error.localizedDescription)")
    }
}
Line 18: locationManager.requestLocation() requests the current location.
We use requestLocation() to get the location once when the button is tapped. For continuous updates, you can use startUpdatingLocation() and stop with stopUpdatingLocation().
Line 22: Retrieves the most recent location using locations.last.
Line 24: Uses CLGeocoder().reverseGeocodeLocation() to get details like country, city, and postal code.
If successful, lines 33–41 build the location string, and line 43 sets it to locationInfoLabel.
Line 49: Handles errors in locationManager(_:didFailWithError:).
That's how to get the current location in an iOS app with Swift.
Adding a Permission Entry for Location Services in info.plist
If you run the code as-is, you'll see the following error message in the output and no location will be retrieved:
This app has attempted to access privacy-sensitive data without a usage description. The app's Info.plist must contain an “NSLocationWhenInUseUsageDescription” key with a string value explaining to the user how the app uses this data
You need to add the NSLocationWhenInUseUsageDescription (Privacy - Location When In Use Usage Description) key to your info.plist.
Open the info.plist file, right-click outside the table, and select [Add Row].
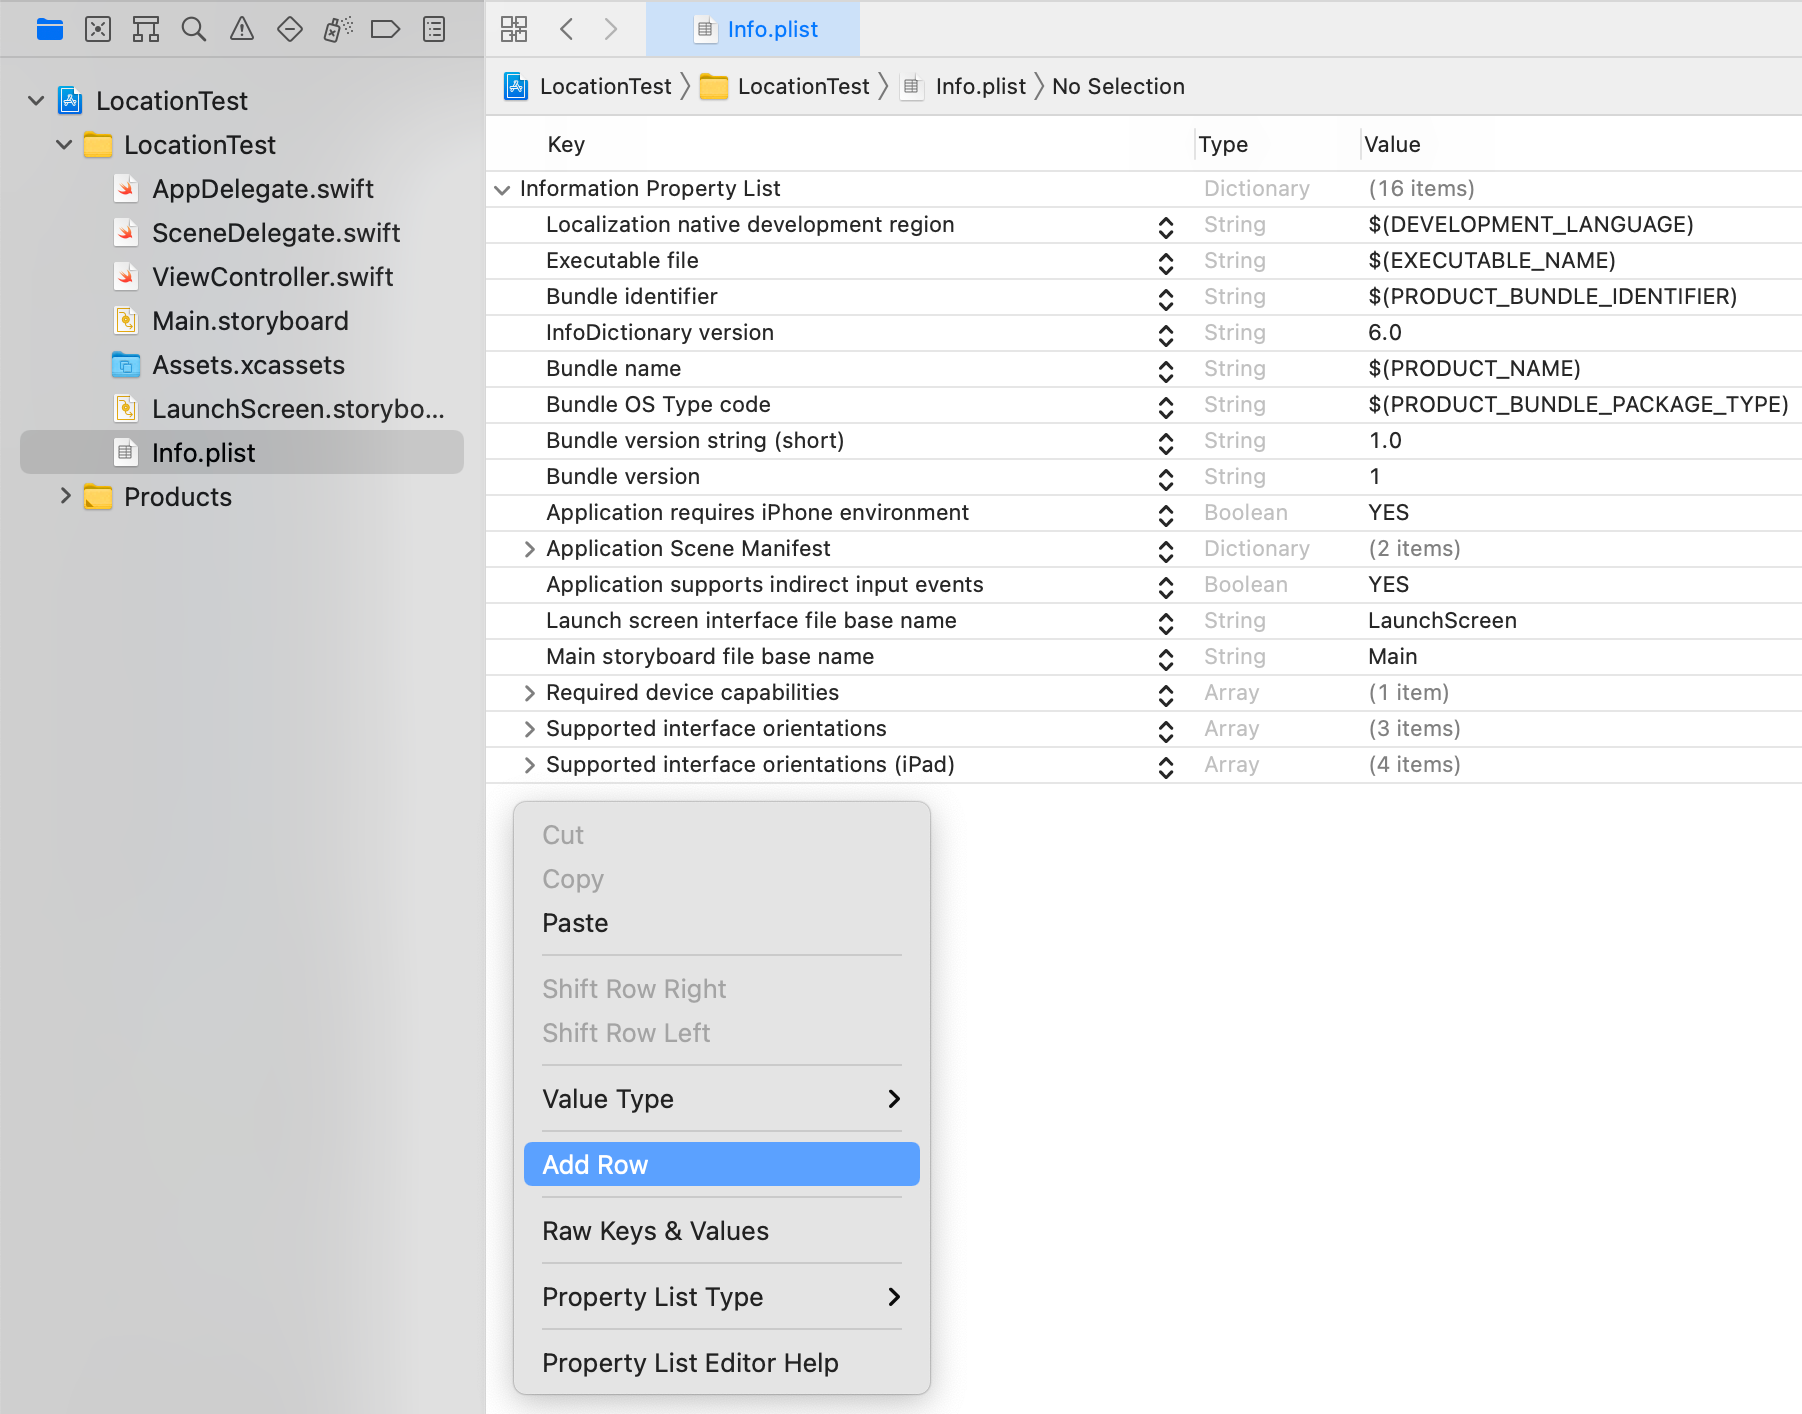
For the Key, enter NSLocationWhenInUseUsageDescription, and for the Value, enter a message explaining why your app requires location data. This text is shown to the user when requesting permission.

If you need location access at all times (not just while using the app), add NSLocationAlwaysAndWhenInUseUsageDescription instead.
Testing the App in the Simulator
Install the app in the Simulator to test it.
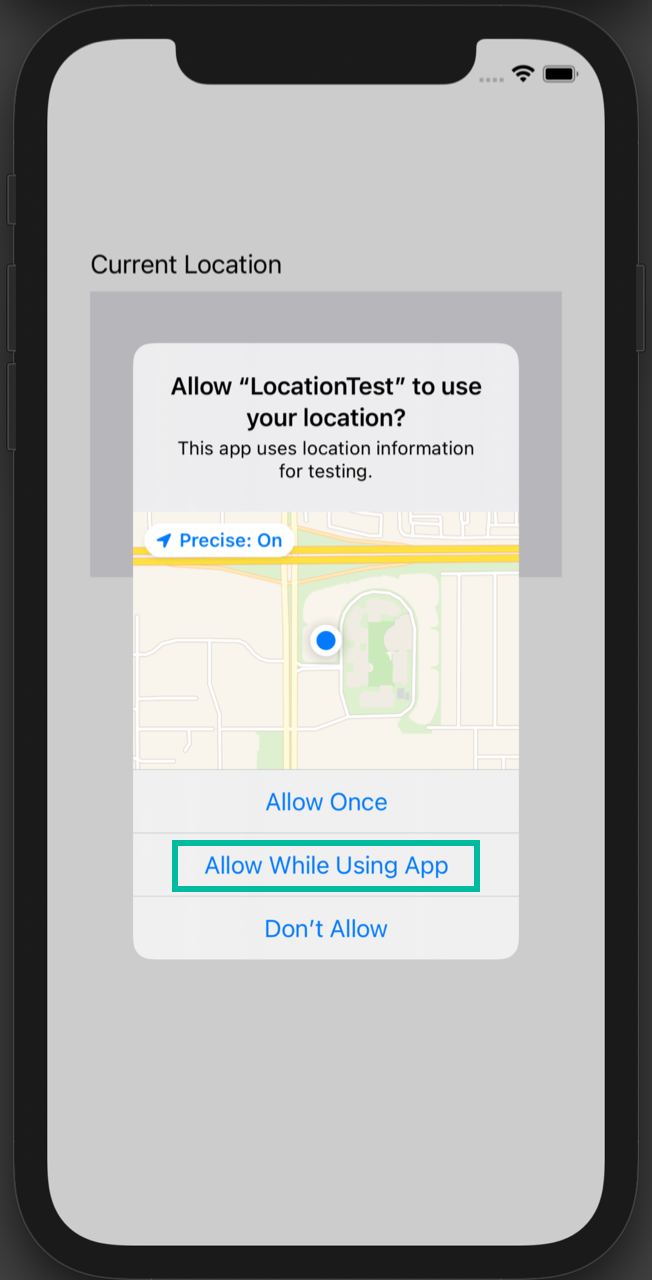
When the app launches, you'll see a prompt asking for permission to use location data. Tap Allow While Using App.
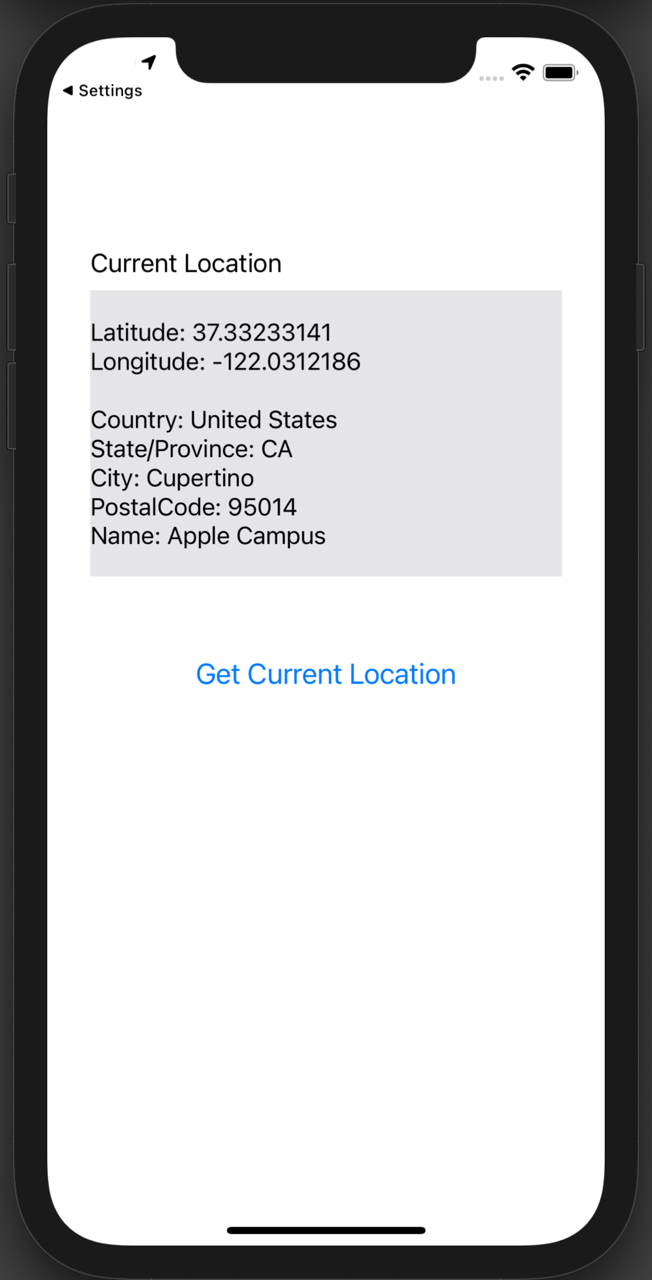
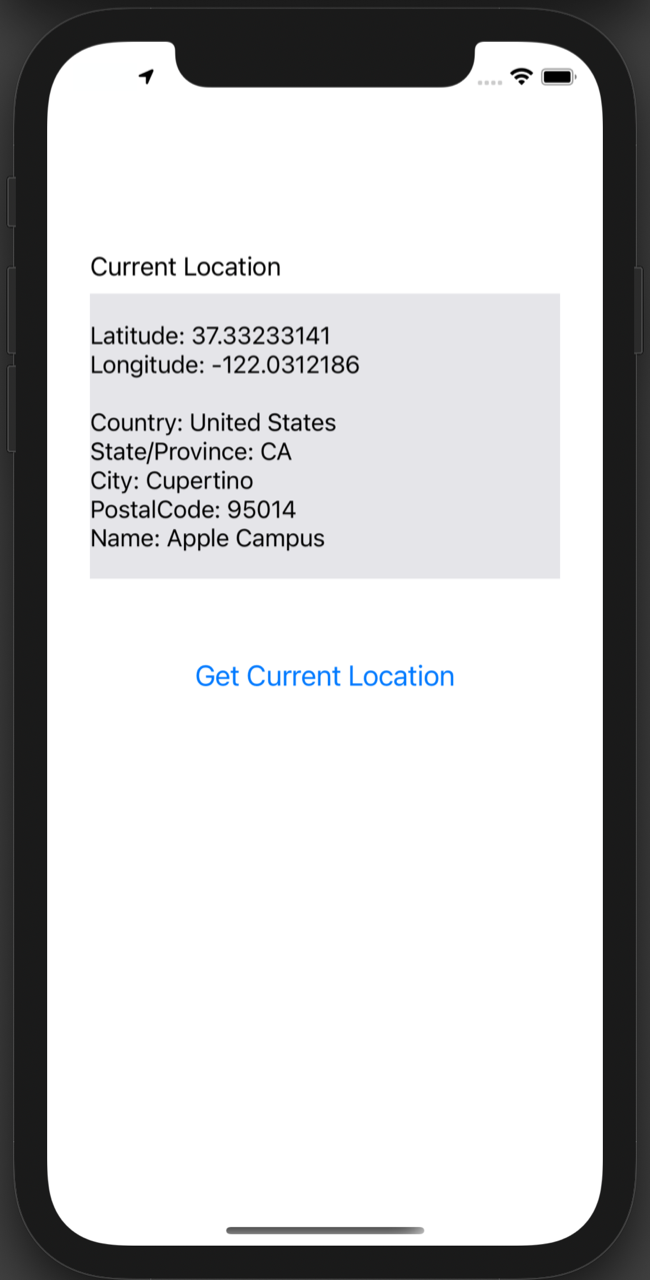
Once the main screen is displayed, tap “Get Current Location” and the location information will be retrieved and displayed in the label.

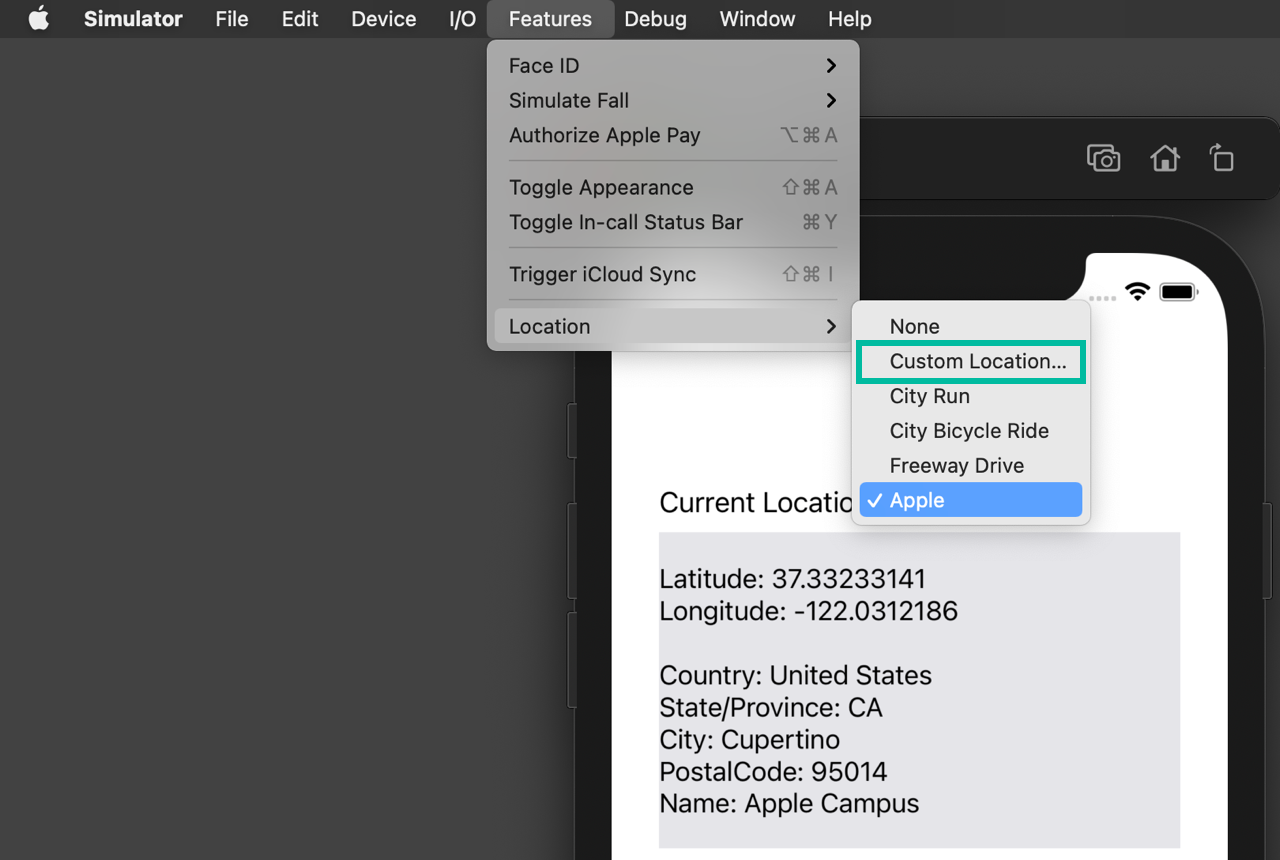
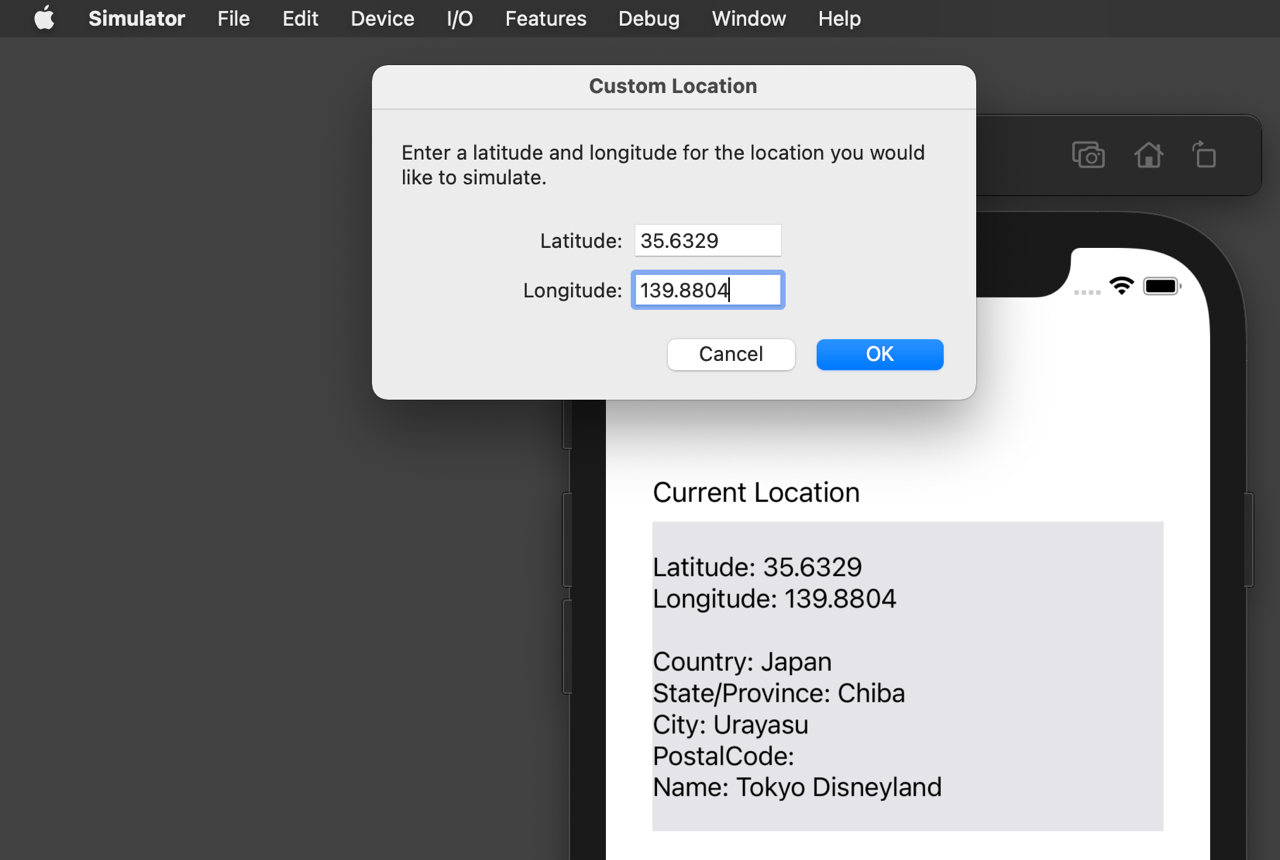
By default, the Simulator's Location is set to Apple HQ. You can change it to a Custom Location with specified latitude and longitude to test with different coordinates.
That's it! We've explained how to get the current location in an iOS app using Swift.